

Capturing images on 35mm or medium format film is enjoyment, and at times actually hard.
And as any movie photographer is familiar with, actually obtaining your wonderful movie photographs on to your computer system is not quick. Confident, you could spend your lab $12 a roll for scans — and a lot of persons do — but you could also scan at household and conserve by yourself a ton of funds. That is what I’m doing.
To make a extremely very long tale quick, when I was hunting for ways to scan my 35mm negatives, I searched about on line and the standard consensus was to get an Epson v550 or v600, which are essentially the very same flatbed scanner with diverse software package choices. This is what I did, and it did not go very well.
I acquired my Epson V600 from a neighborhood Best Obtain for around $280 soon after tax. But just after messing close to with it for a few of times, the scans I was finding out of it had been frankly terrible. So I returned it and now I DSLR scan with a copy stand and a Panasonic camera and a macro lens and a Adverse Supply film carrier… The level is, these odds and finishes definitely insert up, and if I understood what I was carrying out with the Epson, I possibly would not need to have them.
But then I met Nevin Johnson, a landscape photographer with certainly lovely artwork that he shoots on 35mm and 120mm film. His pics glimpse incredible, so how does he do his scans? Surprise! An Epson v550.
So how does he do it, and what was I carrying out completely wrong? I asked him — here’s our dialogue about how to scan 35mm film like a professional:
Note: This phone job interview has been lightly edited for clarity.
Evan: Alright Nevin, introduce your self.
Nevin: Awesome, my identify is Nevin Johnson and I’m from Philadelphia, Pennsylvania. I’m mostly a landscape and cityscape photographer. I generally started by taking pictures nearly anything and almost everything that caught my eye again in the day, specifically macro shots of flowers, then of dawn and sunsets. And given that this is Pennsylvania, you will not need outstanding mountains or something in distinct to get those kinds of shots. Everybody enjoys a great sunset.
Anyway, I commenced to acquire images a good deal more very seriously in 2018, and I found myself editing my electronic get the job done to look like all the movie shots I was viewing on Instagram and Twitter. I was like, man, I actually like all of these tones and colours and fairly substantially anything about film pictures. And at some level I made the decision I may well as perfectly do it myself, and resolved to just shoot film.
The first rolls were being really messed up mainly because the cameras I acquired off of eBay had a bunch of gentle leaks. But I lastly obtained a doing work Pentax K1000 and, when I got my very first roll of Superia 400 back again from the lab, boy I was hooked.
Evan: I must explain this for the viewers: When you consider a roll of movie to a lab, it typically expenditures around $7-8 just to get the movie created, and then another $10 (or way far more) to have them scan it for you. Naturally just one benefit to scanning images on your own is expense, but why did you come to a decision to start out carrying out your personal scans?
Nevin: You know, I would get these photographs back from the lab and I’d be like, gentleman, I remember this scene getting far more vibrant. Like a whole lot. Basically I was getting rid of all the shade in the scans I was getting. What I was figuring out was, due to the fact I was around-exposing my movie, or at minimum exposing for the shadows, the lab tech was blowing out all the highlights.
So I decided to decide up an Epson V550 for my birthday a pair of years back, and it was the finest investment I ever manufactured. It fundamentally turned a whole lot of these rolls that I was uncertain about into bangers.
Evan: Ok, so why did you choose to go with an Epson as opposed to DSLR scanning? And for the reader, there are in essence three primary means to scan movie — working with a flatbed scanner like Nevin is undertaking, employing a DSLR and a macro lens to consider a photo of the adverse (which is what I’m executing), and devoted movie scanners like the Nikon Coolscan collection.
Nevin: Fact be informed, a buddy instructed me that he utilised an Epson, and I do not have a superior macro lens for my digital cameras to do a DSLR scan.
Evan: Haha, all right, then let us dig into your system a little bit. How do you actually do these scans?
Nevin: I do the scanning in the default computer software that arrives with the Epson. Not Silverfast, which arrives with the more recent scanners, but the OG Epson Scan software.
Evan: Let’s communicate about your configurations, can you send me a screenshot of your scan settings?
Nevin:
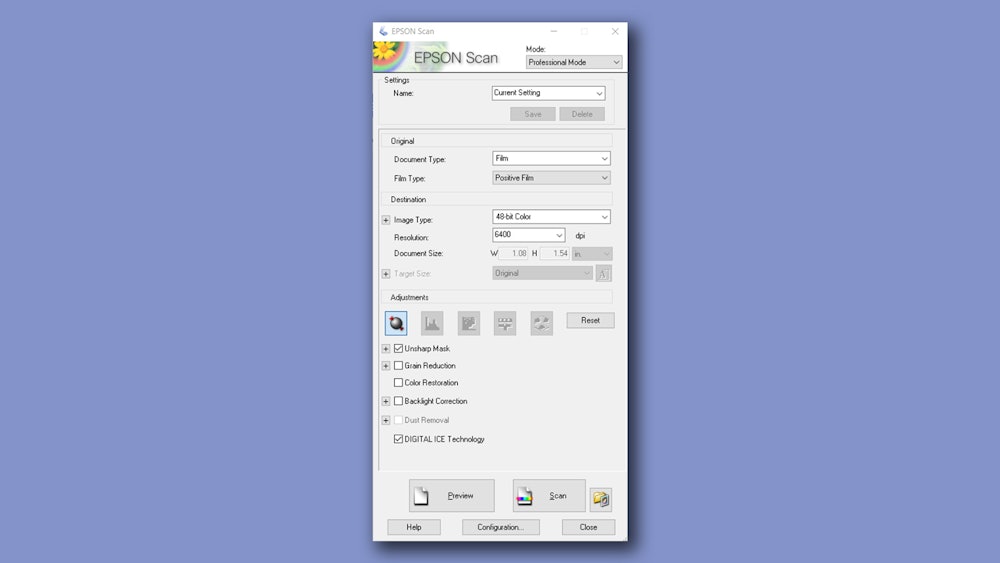
Basically, I have:
- The document variety set to “Film”
- The movie variety set to “Positive Film”
- Image variety: 48-bit coloration
- For 35mm movie I’ll bump it up to 6,400 dpi
- For 120mm I’ll bump it down to 3,200 dpi
- “Unsharp mask” is turned on
- Digital ICE is turned on
“Digital ICE” mitigates some, but not all of the dust.
Evan: And what kind of file does that give you? A TIF?
Nevin: I have it set to JPEG.
Evan: WHAT?? Can you double-examine that for me.
Nevin: Yeah I have it set to export as a around 12-26MB JPEG.
Evan: I should likely explain for the reader that this is complete sacrilege. JPEGs are inherently lossy, so most photographers would almost certainly use a lossless TIF file. But on the other hand, your scans are definitely great.
Nevin: Yeah. I will not know, it’s just the course of action I use and it will work for me. The matter is, you can not actually print a 35mm shot in any case. They are high-quality for the web and socials, but to print substantial, you’d in all probability want a drum scan.
Evan: Alright, as soon as you have them scanned and imported into Lightroom, then what do you do?
Nevin: Ahead of we get to that we have to back up, since this is crucial: When you’re lining up the frames throughout the scanning stage, you require to depart a little little bit of the body border in the scan. You need to have that minor little bit of border so that you can mechanically white harmony the graphic.
The subsequent detail I do is convert the damaging in a plugin termed Adverse Lab Pro (NLP). This is form of perplexing, but you want to crop that minimal little bit of border frame out right before you change the picture in NLP, if not the colors can get messed up.
When the unfavorable is transformed in NLP, you are going to see a bunch of options appear, and you can use these to wonderful-tune the look of the damaging.
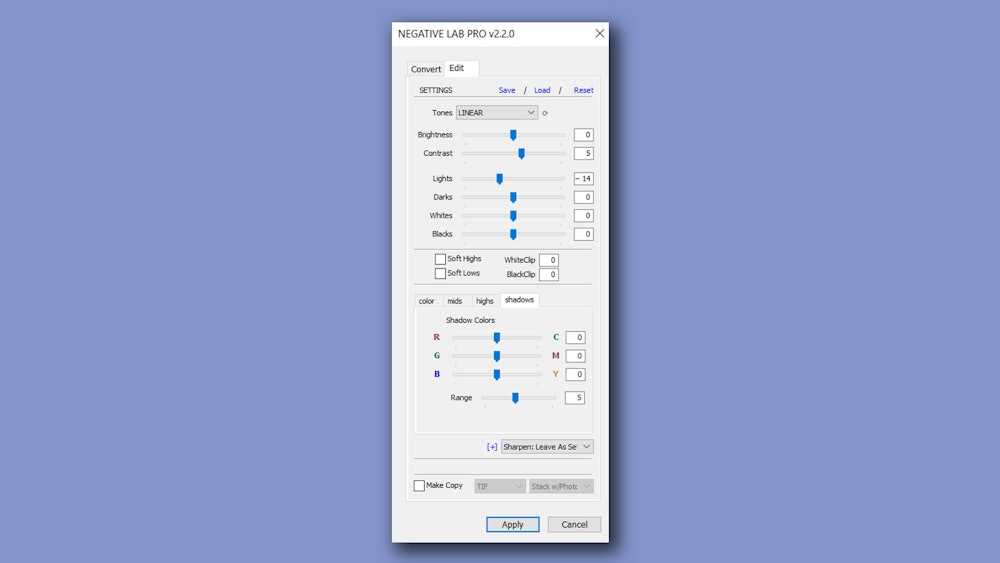
Here’s my setup:
- Coloration model is established to Noritsu
- Saturation is established to 3
- Border Buffer is established to , because I crop the borders
- I have the “Lights” slider established to -10 or -15 by default simply because I overexpose my film
- Enable “Shadows soft”
- “Tone” is set to Shadow Soft, Linear, or Linear Deep
From there I’ll go by means of and enjoy with the configurations and do things like participate in with the distinction and black concentrations, it’s possible tweak the shade stability a little bit.
Evan: Do you at any time improve the LUT?
Nevin: Nah, I just depart it on Frontier.
Evan: All right amazing, do you have any other suggestions for getting your scans to appear fantastic?
Nevin: Yeah, one matter I like to do is upload my closing shots to my cellular phone so that I can see how other folks will see it. It’s fantastic to test on how matters render on the phone.